For a higher quality version of my CCR video please click here. Thank you so much for taking the time to watch my film opening and read my blog.
Saturday, April 14, 2018
Film Opening- "Tiffany"
Our completed film opening is for a film we called "Tiffany". It's bittersweet to have finally completed this project. Although it took a lot of hard work, I believe it paid off in the end. Enjoy!
*p.s. Watch this with headphones for the best experience!
Philip Andrew Buckle. (n.d.). Nobody Like Me [MP3]. Australia: Universal Publishing Production Music Australia Pty. Ltd. APRA.
Phone Alerts And Rings [MP3]. (n.d.). YouTube.
Crises érotiques. (2017, May 26). PAS DANS LE CUL AUJOURD'HUI. Retrieved from http://freemusicarchive.org/music/PAS_DANS_LE_CUL_AUJOURDHUI/La_Comtesse_Sanglante/PAS_DANS_LE_CUL_AUJOURDHUI_-_La_Comtesse_Sanglante_-_07_Crises_rotiques
Sunday, April 8, 2018
Voice Acting Coaching
Because I had written the script, it fell into my hands to direct our voice actor (thank Sophie!) on specifically how to say her lines and how to pace what she said. Although Chancellor and Jacob didn't really feel like timing of the narration was crucial, I gave the voice actor (who actually adapted to my suggestions very well) some notes on the length of pauses, the tone of voice, and the stress she should put on certain portions of dialogue. As we added these clips over our film opening, we were able to choose which lines we felt were the most necessary and cut any lines which were redundant and used up time for important dialogue. Although not all lines were preserved, we were still able to maintain the beginning of our film's plot and introduce Tiffany, the protagonist like we had intended.
One of the failed takes. Intonation was good for the most part, but the speed of some lines and pauses left between portions needed to be changed.
The final take. Tone, speed, volume, and pauses were all satisfactory to our expectations.
Even though we were not able to purchase a professional microphone, the audio produced by recording from Chancellor's phone should suffice. Although an echo is slightly audible in the audio, as this narration is supposed to expose the inner workings of Tiffany's brain, this echo feels fitting.
Thursday, April 5, 2018
The Joys of Editing (Otherwise Known as Spending Hours on a Couple of Seconds)
Clip 1 (establishing Brittney and her setting)
Clip 2 (adding suspense to lead up to Brittney's murder)
Speed and length of clips was always a debate between Chancellor, Jacob, and I, with the pacing and meaning of clips often decided by these factors. Readjusting lighting digitally was always a struggle, and we watched far too many YouTube tutorials on how to do so. The pacing of the clips feels a bit rushed, but given the time limit we must stay within, it felt difficult not to keep a hurried pace to convey our plot. Although we realized some continuity errors during the editing process, they were often very small details only somebody who had worked on the project would notice. Hopefully, these mistakes are not enough to detract from our message.
Because we edited the video on Jacob's computer (and exporting takes far too long), these clips do not include the entire film opening, but are from the beginning of our editing process. We are in the process of adding sound into our film opening (including some foley, narration, and ambient music, but these clips had not yet had sound added to them.
Tuesday, April 3, 2018
Making Fake Blood
For our final shot we wanted to include some kind of gore as well as infer to the viewers that Tiffany had killed Brittney (rather than blatantly display it through a scene of brutal violence). Although none of us has had prior experience with fake blood, we need that we wanted to use it in order to convey this idea to the audience; so decided to follow a recipe. The recipe asked for one part water and three parts corn syrup, with red and blue (or green) food coloring until the mixture reached the desired consistency and color. Many dyed hands later, after adjusting the fake blood mixture (and dumping our first batch) we were able to make the fake blood we had imagined.


3 parts corn syrup and 1 part water

After adding red and blue food coloring, we realized that we had added too much water.
The mixture was not viscous enough and look more like cough syrup than blood.


The scene we were able to create. p.s. it looks better in the dark
Blood. Retrieved March 28, 2018, from https://thesecretyumiverse.wonderhowto.com/how-to/make-realistic-looking-fake-blood-0133528/
Sunday, April 1, 2018
Finally Filming!
Finding a filming location began promisingly but quickly became a hassle as the location we needed to film in (a house which we originally intended to be large and expensive-looking) is not exactly easy to book for several nights of filming. Because Chancellor, Jacob, and I did not even have an empty room we could stage for our film within our houses, we had to resort to asking any friends and relatives we knew to borrow a portion of their home until we were done filming. After our request was declined by several people, my aunt (who lives very close to us) graciously offered us her empty guest room which turned out to sufficiently serve its purpose.
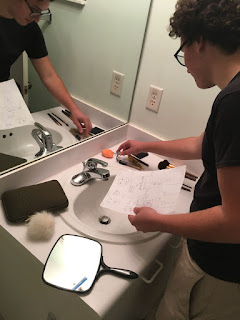

Staging the bathroom using props
The room we used in my aunt's house didn't exactly scream teenage girl, so we had to put in some work to adjust the scenery and match our vision for set design. Because Chancellor, Jacob, and I don't have any makeup of our own, we asked our wonderful actresses to bring some of their own which we then chose from to decorate our set in the manner we thought best. Earlier, we thought of what objects we most envisioned when we picture our character Brittney, and many of the objects pictured are among those which we felt connected to the character. A multiple mirrors may reflect her self-absorption, various makeup utensils show her focus on appearances, and accessories like the fuzzy, white pom-pom shown are often associated with popular, teenage girls.

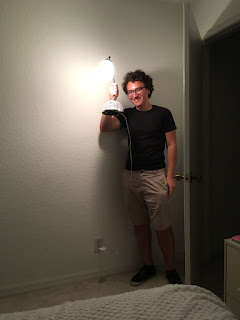
Trying to figure out lighting in the relatively small room
Since we were limited to a relatively small, square room, we had to utilize it for Tiffany's initial shots and the setting of Brittney's room. Because we purposely chose low-key lighting for Tiffany's shots in the beginning, the obscurity of setting made it much easier for us to re-purpose the room. We filmed low to the ground, with the computers, tablets, and phones we placed into these shots filling most of the frame or sharing the frame with Tiffany. As the subject or focus was not the setting of the first shots, but rather Tiffany's clear obsession with social media, we are (hopefully) able to get away with not having two separate locations to shoot.
Framing, lighting, and the angle at which we shot at seemed to be consistent issues, but after many shots and readjustments we attempted to fix glaring issues. For aesthetically pleasing shots, we often framed the subject using ideas such as the rule of thirds (which we learned early into the year), however, it was often difficult to decide whether it was necessary to break filming guidelines, and whether doing so would portray a specific idea to the audience. Our storyboard helped immensely with keeping us on schedule, keeping our filming consistent, and allowing our shots to convey meaning as we had planned. Some shots and ideas had to be altered to fit our location, but overall I believe we have maintained most of the meaning we intended to construct through our film opening. It was interesting to direct and work with actors, given my history of having others also working on a project with me act. I am both dreading and looking forward to reviewing all of our footage.
Now that filming is wrapped, we just need to wait for our footage to export before we can begin editing. The incorporation of credits, a title screen, and editing together all of the footage we took is an integral (exciting) part of post-production. Especially given the fact that we are adding much of the sound in during the editing process, editing may be even more time-intensive than filming. Once we get into the editing process, I'll be able to explain more of the individual shots and choices behind mise-en-scène.
Thursday, March 29, 2018
Lighting...More Artificial Than You Think
Lighting was by far the largest challenge we faced in the process of filming, especially as our film opening was meant to be set during the nighttime. Because Jacob, Chancellor, and I did not have much prior experience with lighting, it took much experimenting to get the lighting for our shots to a satisfactory level. Because of this, I thought to look into some common lighting techniques in the horror genre and how to achieve them. A feature brought up in various articles I read was the idea of obscuring light in order to both reduce its harshness and create specific shadows surrounding the subject. Utilizing colored filters on light to influence mood of a shot, shooting in daylight and obscuring light to appear dark, and lighting from below were suggested
Although on our low budget we did not have access to expensive lighting equipment, we made do with some lamps, flashlights, various phone and computer screens, blankets/sheets, and a lot of patience. We truly learned that although lighting in film may seem natural, it often takes much artificial manipulation for lighting to appear so on camera.


Although on our low budget we did not have access to expensive lighting equipment, we made do with some lamps, flashlights, various phone and computer screens, blankets/sheets, and a lot of patience. We truly learned that although lighting in film may seem natural, it often takes much artificial manipulation for lighting to appear so on camera.
Our first issue was that it was daylight when we were scheduled to begun filming, but our first shots were intended to be filmed in near-darkness. Because we wanted to be able to manipulate the daylight coming from through the window in order to ensure that our shots were visible even in darkness, we utilized a thick blanket layered over a thin blanket to cover the window. Because the thin blanket filtered the light and the thick blanket blocked much of the light, we were able to create an opening for light to pass through to our liking depending on the shot.

Our blanket setup with the lights in the room on
The same setup with the lights in the room off
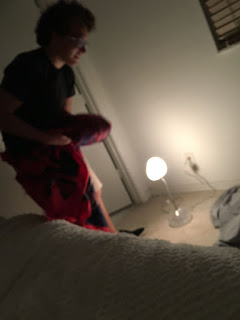
Although later in the scene Brittney is supposed to be shown in her room with the lights on, the actual lights of the room we utilized were too yellow in tinge and did not give off the creepy mood we were going for. Because none of the lighting in the house came out very well on film, lamps were very useful and easily manipulable (being able to be tilted at different angles and obscured with other objects) as a replacement.

Setting up a lamp before filming
We wanted to create a clear tone shift when Tiffany (the killer) enters Brittney's house and finally finds her, and though to use some color theory that we have learned to emphasize this. In order to reflect this, we chose to cover a lamp with a red sheet to create the reddish, pinkish lighting we wanted to both reflect a sense of danger and violence (with the red) as well as femininity (with the pink).

Throughout filming, it was difficult to find a balance between enough light for the subject to be viewable and maintaining the illusion of darkness. Hopefully, when shown on a screen, our footage will be clearly lit and appear as we intended (otherwise we may need to re-shoot much of it).
O'Rourke, T. (2012, October 1). Horror Film Lighting On a Budget. Retrieved March 27, 2018, from https://www.videomaker.com/article/c13/15436-horror-film-lighting-on-a-budget
Renée, V. (2016, October 27). 8 Spooky Lighting Techniques You Can Use in Your Horror Film. Retrieved March 26, 2018, from https://nofilmschool.com/2016/10/8-spooky-lighting-techniques-you-can-use-your-horror-film
Risk, M. (2018, March 06). How to Use Color in Film: 50 Examples of Movie Color Palettes. Retrieved March 27, 2018, from https://www.studiobinder.com/blog/how-to-use-color-in-film-50-examples-of-movie-color-palettes/
Subscribe to:
Posts (Atom)